Battery switch on travel trailer function is crucial for managing your RV’s power. Understanding how it works, from the different switch types (single-pole, double-pole, etc.) to troubleshooting common issues, is key to avoiding electrical problems and ensuring a smooth camping experience. This guide will walk you through everything you need to know about your travel trailer’s battery switch, from its basic function to advanced maintenance and upgrades.
We’ll cover how the battery switch interacts with your trailer’s other electrical components like solar panels and inverters, and how to safely operate it to prevent issues like backfeeding. We’ll also delve into troubleshooting, providing step-by-step instructions and diagrams to help you diagnose and fix common problems. Get ready to become a battery switch expert!
Battery Switch Types in Travel Trailers

Choosing the right battery switch for your travel trailer is crucial for managing your power sources efficiently and safely. Understanding the different types available helps you select the one that best suits your needs and setup. This section will explore the common types of battery switches found in travel trailers, outlining their advantages and disadvantages to aid in your decision-making process.
Battery Switch Types and Their Characteristics
Travel trailers utilize various battery switch types to control the flow of power from your batteries to the trailer’s electrical system. The most common types include single-pole, double-pole, and double-pole double-throw switches. Each offers distinct functionalities and suits different configurations.
Single-Pole Battery Switches
A single-pole switch controls the power from a single battery to a single circuit or system. It’s a simple on/off switch, ideal for smaller trailers with only one battery or for isolating a specific circuit.
So, you’re planning a trip? Awesome! First things first: get yourself sorted with travel insurance. Check out Aon travel insurance for comprehensive coverage. Then, think about your in-trip entertainment; if you’re an audiophile, you’ll want to check out audiophile travel setup guides to ensure your listening experience on the road is top-notch. Planning ahead makes for a smoother, more enjoyable trip, so get those essentials covered before you go!
Double-Pole Battery Switches
Double-pole switches control power from a single battery to two separate circuits, often used to isolate both the positive and negative terminals simultaneously for increased safety. This provides better isolation than a single-pole switch.
Double-Pole Double-Throw (DPDT) Battery Switches
DPDT switches are more complex, allowing you to switch between two different battery banks (e.g., a house battery and a starting battery) or select which battery bank powers your trailer. This offers greater flexibility for managing multiple batteries.
Comparison of Battery Switch Types
| Type | Description | Advantages | Disadvantages |
|---|---|---|---|
| Single-Pole | Controls power from one battery to a single circuit. | Simple, inexpensive, easy to install. | Limited functionality, only suitable for single-battery systems or isolating specific circuits. |
| Double-Pole | Controls power from one battery to two separate circuits, isolating both positive and negative terminals. | Improved safety due to simultaneous isolation of both poles, suitable for larger systems. | Still limited to a single battery source. |
| Double-Pole Double-Throw (DPDT) | Allows switching between two different battery banks or selecting the power source. | Greater flexibility, ideal for managing multiple batteries, allows for independent control of battery banks. | More complex installation, higher cost. |
Functionality of the Battery Switch: Battery Switch On Travel Trailer Function
The battery switch in your travel trailer is a crucial component of its electrical system, acting as a master control for your house batteries. It allows you to disconnect your house batteries completely from the rest of the trailer’s electrical system, preventing unwanted drain and protecting your batteries from damage. This is especially important for long-term storage when you’re not using your trailer.The battery switch manages power flow between your travel trailer’s house batteries and the charging sources, such as your tow vehicle’s alternator or a shore power connection.
When the switch is “ON,” it completes the circuit, allowing power to flow from the batteries to the various appliances and systems in your trailer. Conversely, when it’s “OFF,” it breaks the circuit, isolating the batteries and preventing any discharge. This control over power flow is essential for maintaining battery health and preventing accidental discharge that could lead to a dead battery and leave you stranded.
Safe Operation of the Battery Switch
Before interacting with the battery switch, always ensure you’ve turned off all appliances and electronics in your travel trailer. This prevents unexpected power surges and helps maintain a safe working environment. Locate the battery switch; it’s usually near the batteries themselves or within a readily accessible compartment. The switch itself will typically have clearly marked positions, such as “ON,” “OFF,” and potentially additional positions depending on the type of switch.To turn the battery switch ON, carefully move the switch lever to the “ON” position.
You should hear a definite click indicating that the switch has engaged. To turn the battery switch OFF, similarly move the switch lever to the “OFF” position. Again, you should hear a distinct click confirming the switch is off. After turning the switch off, double-check that all lights and appliances are off to ensure the batteries are completely isolated.
Remember to always consult your travel trailer’s owner’s manual for specific instructions and diagrams related to your battery switch. Improper use could lead to electrical issues or damage to your batteries.
Troubleshooting Common Battery Switch Issues
Your travel trailer’s battery switch is a crucial component, ensuring you can easily switch between your trailer’s battery and the tow vehicle’s charging system or shore power. When it malfunctions, however, you’ll be left with a dead battery and a frustrating situation. Understanding common problems and troubleshooting steps can save you time and potential headaches.Troubleshooting a malfunctioning battery switch involves systematically checking various points, starting with the simplest and moving to more complex issues.
Remember safety first: always disconnect the negative terminal of your battery before starting any work.
Corrosion and Loose Connections
Corrosion is a frequent culprit behind battery switch problems. The buildup of corrosion on the terminals and switch contacts prevents proper electrical connection, leading to poor charging or complete power failure. Loose connections, often caused by vibration during travel, suffer from the same problem.Inspect the battery terminals and the switch terminals for any signs of corrosion – a white, green, or bluish-gray powdery substance.
Use a wire brush or terminal cleaner to remove corrosion thoroughly. Tighten any loose connections using a wrench, ensuring a secure fit. Applying a thin layer of dielectric grease after cleaning will help prevent future corrosion.
Faulty Battery Switch
If cleaning and tightening connections don’t resolve the issue, the switch itself might be faulty. This could be due to internal wear and tear, damage from moisture, or simply a manufacturing defect.To test the switch, you’ll need a multimeter. First, ensure the switch is in the “off” position. Then, use the multimeter to check for continuity between the input and output terminals of the switch.
If there’s continuity, the switch is faulty and needs replacing. If there is no continuity, and the switch is in the ‘on’ position, you need to check the wiring and connections again.
So, you’re planning a trip? Awesome! First things first: get yourself sorted with travel insurance. Check out Aon travel insurance for some solid options; peace of mind is priceless, especially when you’re exploring new places. And while you’re at it, don’t forget the tunes! A killer audiophile travel setup can seriously elevate your road trip experience.
Seriously, good music makes everything better.
Troubleshooting Flowchart
Step 1: Visually inspect the battery terminals and the battery switch for corrosion and loose connections.
Step 2: Clean any corrosion using a wire brush or terminal cleaner and tighten any loose connections.
Step 3: Reconnect the battery and test the system. If the problem is resolved, you are done.
Step 4: If the problem persists, use a multimeter to check for continuity between the input and output terminals of the switch with the switch in the “off” position. If continuity exists, the switch is faulty.
Step 5: If there’s no continuity in the “off” position but still a problem when the switch is in the “on” position, re-check all wiring and connections for any breaks or damage.
Step 6: Replace the faulty battery switch if necessary.
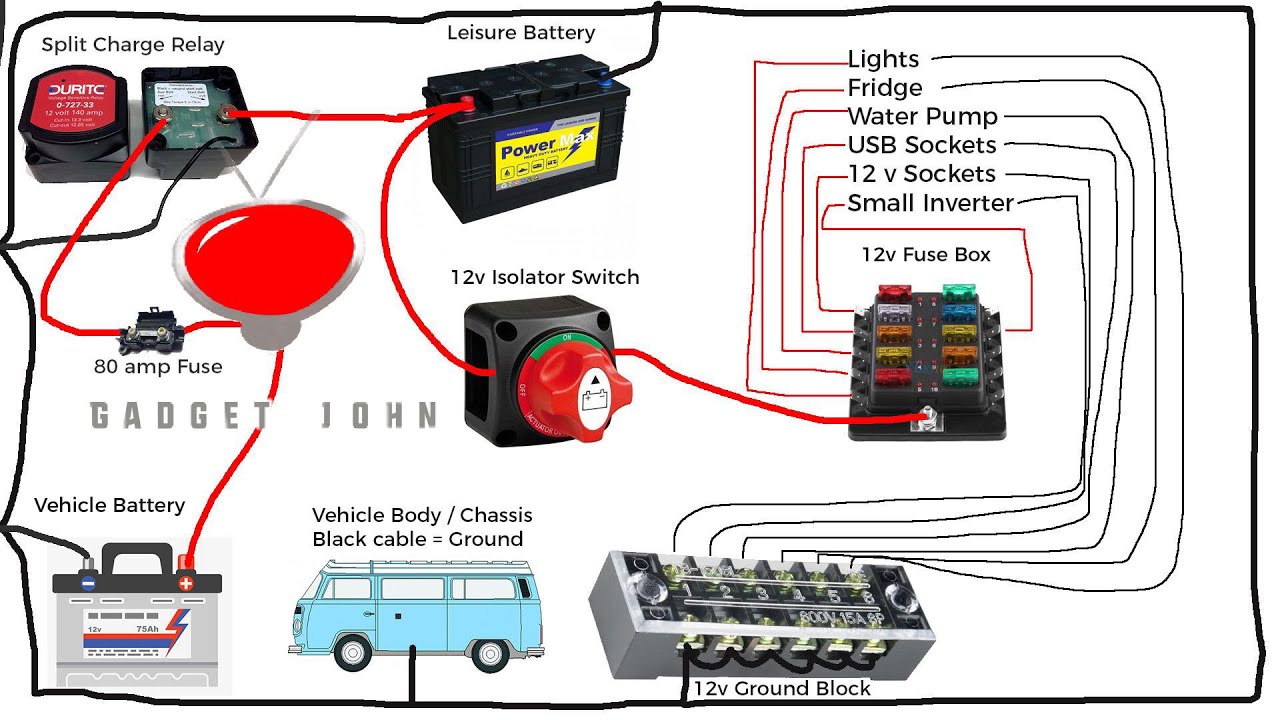
Battery Switch and Electrical System Integration
Your travel trailer’s battery switch isn’t an isolated component; it’s a crucial link in a chain of electrical systems. Understanding how it interacts with other parts like solar panels, the converter, and the inverter is key to preventing problems and maximizing your off-grid power. This section will explain its role in keeping everything running smoothly and safely.The battery switch acts as the central on/off control for your house batteries, dictating when they’re connected to the rest of the trailer’s electrical system.
This control is vital for several reasons, most importantly for preventing dangerous backfeeding situations. By isolating the batteries when not needed, you prevent potentially damaging current from flowing back into the batteries from other sources. Proper integration with other systems ensures efficient power management and safeguards your equipment.
Preventing Electrical Backfeeding, Battery switch on travel trailer function
Backfeeding occurs when power flows from a source other than your batteries (like shore power or solar panels) back into the batteries. This can damage the batteries, potentially leading to overheating, explosion, or premature failure. The battery switch acts as a crucial safety device by allowing you to disconnect the batteries completely from the rest of the system, thus preventing this backfeeding.
For instance, if your solar panels are generating power while you’re plugged into shore power, the switch allows you to isolate the batteries, preventing overcharging and potential damage. Similarly, if a problem occurs with your shore power connection, disconnecting the batteries protects them from potential surges or reverse current flow.
Interaction with Other Electrical Components
A simplified diagram can illustrate the relationship:Imagine a box representing the battery switch. From one side, two thick lines represent the house batteries (+ and – terminals). On the opposite side, multiple lines branch out. One line leads to a box labeled “Converter,” which changes AC power from shore power to DC power for charging the batteries and powering DC appliances.
Another line connects to a box labeled “Inverter,” which transforms DC power from the batteries into AC power for running AC appliances. A third line connects to a box labeled “Solar Panel Array,” which supplies DC power directly to the batteries when sunlight is available. Finally, a line goes to a box labeled “12V DC Circuit,” which represents the main wiring supplying power to the trailer’s lights, water pump, and other 12V appliances.[Descriptive caption for the diagram: This diagram shows the central role of the battery switch in connecting and disconnecting the house batteries from the rest of the travel trailer’s electrical system.
The switch controls the flow of power between the batteries and components like the converter, inverter, solar panels, and the trailer’s 12V DC circuit.]
Maintenance and Safety Precautions
Regular maintenance of your travel trailer’s battery switch is crucial for ensuring reliable power and preventing potential hazards. Neglecting this simple task can lead to frustrating breakdowns and, in some cases, even dangerous situations. This section details the recommended maintenance procedures and safety guidelines to keep your system running smoothly and safely.
Proper maintenance and safety practices are paramount when dealing with your travel trailer’s battery switch and electrical system. Ignoring these precautions can lead to serious problems, from minor inconveniences to significant safety risks. Always prioritize safety when working with electricity.
Recommended Maintenance Procedures
Performing these routine checks and maintenance tasks will significantly extend the life of your battery switch and ensure the reliable operation of your trailer’s electrical system. These steps are relatively simple and can prevent costly repairs down the road.
- Inspect Connections: Regularly check all connections to the battery switch for corrosion, looseness, or damage. Tighten any loose connections and clean corroded terminals with a wire brush and baking soda solution. Apply a dielectric grease to prevent future corrosion.
- Switch Operation: Periodically test the switch’s functionality by turning it on and off, ensuring it clicks firmly into each position. Listen for any unusual noises that might indicate a problem.
- Visual Inspection: Visually inspect the switch itself for any signs of damage, such as cracks, burns, or excessive wear. Replace the switch if you notice any damage.
- Battery Terminal Cleaning: Clean the battery terminals themselves regularly. Corrosion buildup on the terminals can hinder current flow and lead to premature battery failure.
- Cable Inspection: Examine the cables connecting to the battery switch for any fraying, cuts, or damage. Replace any damaged cables immediately.
Safety Guidelines for Working with the Battery Switch and Electrical System
Working with electricity always carries inherent risks. Following these safety guidelines will significantly reduce the chance of accidents or injuries.
- Disconnect Power: Always disconnect the negative battery cable before performing any maintenance or repairs on the battery switch or any part of the trailer’s electrical system. This prevents accidental shocks or short circuits.
- Use Insulated Tools: Use insulated tools when working with electrical components to avoid accidental shocks. Ensure that your tools are in good condition and properly insulated.
- Wear Safety Glasses: Wear safety glasses to protect your eyes from sparks or flying debris when working near the battery or electrical connections.
- Proper Ventilation: Batteries emit gases. Work in a well-ventilated area when working with batteries to avoid inhaling potentially harmful fumes.
- Avoid Contact with Acid: Battery acid is corrosive. Avoid contact with battery acid, and if contact occurs, immediately flush the affected area with water and seek medical attention if necessary.
Potential Hazards Associated with Improper Battery Switch Use and Maintenance
Improper use and maintenance of the battery switch can lead to a variety of hazards, ranging from minor inconveniences to serious safety risks. Understanding these potential problems is the first step in preventing them.
- Electrical Fires: Loose or corroded connections can create sparks and generate heat, potentially leading to electrical fires.
- Battery Explosions: Overcharging or short-circuiting a battery can cause it to overheat and explode, releasing corrosive acid and potentially causing injury.
- Electrical Shocks: Improper handling of electrical components can result in serious electrical shocks, potentially leading to injury or death.
- System Malfunction: A faulty battery switch can cause the entire electrical system to malfunction, leaving you without power for lights, appliances, or other essential systems.
- Premature Battery Failure: Corrosion and poor connections can lead to premature battery failure, requiring expensive replacements.
Upgrading or Replacing the Battery Switch
Upgrading or replacing your travel trailer’s battery switch is a straightforward process that can significantly improve your RV’s electrical system performance and reliability. Choosing the right switch and installing it correctly is crucial for safety and preventing damage to your batteries and other components. This section will guide you through the process, covering key considerations and providing a step-by-step guide.Factors to Consider When Upgrading or Replacing a Battery SwitchWhen choosing a replacement battery switch, several factors are critical.
The most important is the amperage rating. This must be equal to or greater than the maximum current your batteries can deliver. Underestimating this could lead to overheating and potential fire hazards. You should also consider the switch type. While simple on/off switches are common, more advanced switches offer features like battery combiners or individual bank control, providing greater flexibility and control over your battery system.
Finally, consider the physical size and mounting style to ensure compatibility with your existing setup. A larger switch might require more space, and the mounting holes need to align correctly.
Battery Switch Replacement Steps
Replacing a battery switch involves disconnecting the existing switch, installing the new one, and carefully reconnecting the wires. Safety is paramount throughout this process. Always disconnect the negative battery terminal before starting any work to prevent accidental shorts. Furthermore, always double-check your wiring connections before reconnecting the battery.
Step-by-Step Guide to Replacing a Battery Switch
- Disconnect the Battery: Use a wrench to disconnect the negative (-) terminal from your battery. This is crucial to prevent accidental shorts and electrical shocks. Ensure the wrench is properly sized to avoid damaging the terminal.
- Identify Wires: Carefully examine the wiring connected to your old battery switch. Take notes or photos to record the connection points of each wire. This will be vital when installing the new switch. Different colored wires usually represent different circuits (e.g., positive, negative, chassis ground).
- Remove the Old Switch: Once the wires are disconnected, carefully remove the old battery switch from its mounting location. This may involve removing screws or bolts. Take note of the mounting method for later use.
- Install the New Switch: Mount the new battery switch in the same location as the old one, using the appropriate screws or bolts. Ensure it is securely fastened and aligned correctly.
- Reconnect the Wires: Connect the wires to the new switch, following the notes or photos you took earlier. Double-check that each wire is connected to the correct terminal. Incorrect wiring can lead to serious problems.
- Test the Switch: Reconnect the negative (-) battery terminal. Turn the new switch on and off to verify that it is functioning correctly. Check the voltage at the battery terminals and any connected loads to confirm proper operation. If everything works correctly, the process is complete. If not, double-check all connections.
Illustrative Example of a Battery Switch Replacement
Imagine the old switch is a simple rocker switch mounted on a panel inside the RV’s battery compartment. The wires are color-coded: red for positive, black for negative, and a bare copper wire for ground. The new switch is a similar rocker switch, but with a higher amperage rating. The steps would involve using a wrench to loosen the nut on the negative terminal, carefully noting the wire connections (photographing is highly recommended), unscrewing the old switch from the panel, mounting the new switch, carefully matching the wires to their correct terminals (red to positive, black to negative, bare copper to ground), and then testing the switch’s functionality.
A multimeter could be used to confirm correct voltage readings after the reconnection.
Mastering your travel trailer’s battery switch is essential for safe and reliable power. By understanding its function, performing regular maintenance, and knowing how to troubleshoot common problems, you can ensure your RV’s electrical system runs smoothly, leaving you free to enjoy your adventures. Remember, safety first – always disconnect power before working on any electrical components. Happy travels!
FAQ Summary
What happens if my battery switch is faulty?
A faulty switch can lead to power loss, inconsistent charging, or even damage to other electrical components. You might experience dead batteries or intermittent power.
How often should I inspect my battery switch?
Ideally, inspect your battery switch at least once a year, or more frequently if you use your RV extensively. Check for corrosion, loose connections, and signs of damage.
Can I replace my battery switch myself?
While possible, replacing a battery switch requires some electrical knowledge and comfort working with wiring. If you’re unsure, it’s best to consult a professional RV technician.
What’s the difference between a single-pole and a double-pole switch?
A single-pole switch controls one circuit, while a double-pole switch controls two. Double-pole switches offer more safety features, particularly for larger systems.
